再推荐个好东东: Virtualbox 转! 实用电脑2008-09-16 03:05:21
Virtualbox 1.6, which was released in May 2, was the first major release since Sun took over virtualbox. All I can say is Wow!! This is perhaps the single biggest, most important open source release which will change the face of how computers are used for years to come. Hell this is even bigger than the release of hardy heron (IMO), and Ubuntu 8.04 LTS was a very important release.
One single feature of virtualbox, seamless, will make some major software completely redundant in coming years. Don’t get me wrong, seamless was possible with virtualbox since the last release before 1.6; but it was buggy, not a part of the features and needed a decent amount of hack and workaround to even get it to work. So seamless was possible, but never like this. With virtualbox 1.6 seamless is truly effortless, and well integrated, and super fast.
I think because of seamless virtual machine, the use of software like wine (compatibility layer for running Windows programs on linux environment), Cygwin (Linux-like environment for Windows), or a commercial product for a virtual machine like vmware, will be redundant. For developer like me, who constantly have to switch back and forth between linux and windows environment, this is god-send.
For a list of new features, bug fixes, check out the official changelog: http://www.virtualbox.org/wiki/Changelog
So lets get going and see how to install and setup seamless virtual machine.
Installing Linux guest in Windows host and configuring seamless mode
Step 1: Setting up Virtual Machine
Download and install virtual box for windows over here.
Create a new virtual machine but clicking “New”:

Choose a name for the virtual machine, choose the distro you would like to install. For this example, I chose Ubuntu.

Next we have to select the base memory. Here I would like to say a few words. Virtual machine are not for all systems, with the decreasing price of ever so powerful dual and quad-core systems, it would be a good investment for you to truly experience the integration of seamless virtual machine. Memory is also very important, I am showing this example on a quad-core with 3Gb of memory.
I am using 1GB for my virtual machine.

Next we will create a virtual dynamic disk for the virtual machine:

The rest of the selection process is pretty straight forward:

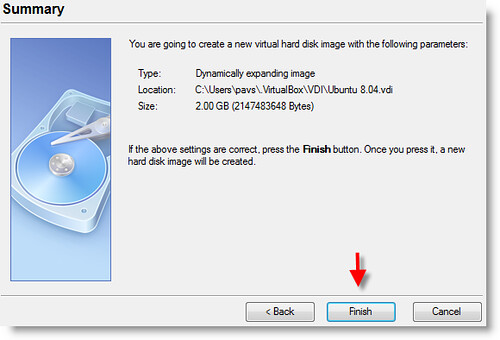
I choose 2GB because that all I need for this example, you can choose whatever amount you like.


After creating virtual disk, it should give you summary and that should end the wizard. Before you go on and start the virtual machine you have to assign the Ubuntu image file you should have downloaded by now before instalation. Just mount your ISO image file to the virtual machine cd drive:

(click for larger image)
Go ahead start the virtual machine by clicking start on top of the menu. Now the OS installation (Ubuntu here) should start. After you are done with installing the OS, go to the next section to configure seamless feature.
Step 2: Setting up Seamless
Before you restart after installation, make sure you unmount the OS image file, the same way you mounted it.
Now we will install “Guest additions” (Device –> Install Guest additions), which will add many of the features needed to enable seamless and other features of the guest OS.

Double-click or run the file VboxLinuxAdditions.run as root, which will install guest additions.


Restart guest ubuntu OS, go to Machine –> Seamless mode. Now you should have two OS running side by side, with the ability to copy&paste any information, without having to press “host” key to switch back and front from guest OS.

This is how my Desktop looks like now, very cool stuff. :)
I hope you found this article usefull as much as I have enjoyed making it.
If you liked this article, please share it on del.icio.us, StumbleUpon or Digg. I’d appreciate it. :)
