十二款操作系统安装全程图解 chaoren2007-08-16 22:56:16
chaoren2007-08-16 22:56:16
十二款操作系统安装全程图解
| Windows 98篇: 一、准备工作: 1.首先当然是要准备好Windows 98的系统安装光盘。 2.在可能的情况下,可以在运行安装程序之前用磁盘扫描程序将所有硬盘扫描一遍,检查硬盘错误并进行修复,否则安装程序运行时如果检查到有硬盘错误就会很麻烦。 3.如果安装过程中需要用产品密匙(安装序列号)的,用纸张记录安装文件的产品密匙(安装序列号)。 4.安装之前可以用驱动程序备份工具(如:驱动精灵)将Windows 98下的所有驱动程序备份到硬盘上(如∶Frive)。最好能上网下载本机的网卡驱动和调制解调器等的驱动程序,如果你用宽带连接请下载并保存宽带拨号软件Enternet300,能上网就能找到大部分所要的软件。 5.如果你想在安装过程中格式化C盘(建议安装过程中格式化C盘),请备份C盘有用的数据。 6.必须有FAT或FAT32文件系统格式的分区,因为Windows 98只能安装在FAT或FAT32文件系统格式的分区,推荐分区空间大于2G。 二、用光盘启动系统: (如果你已经知道方法请转到下一步),将98安装光盘放入光驱,重新启动系统并把光驱设为第一启动盘,保存设置并重启,如无意外即可见到安装界面。 三、安装Windows 98 光盘自启动后,如无意外即可见到启动界面,将出现如下图所示,如光盘不能自启动,可用98启动软盘启动(设软驱为第一启动盘)。  screen.width*0.7) {this.resized=true; this.width=screen.width*0.7; this.alt='Click here to open new window\nCTRL+Mouse wheel to zoom in/out';}
}" border="0" /> screen.width*0.7) {this.resized=true; this.width=screen.width*0.7; this.alt='Click here to open new window\nCTRL+Mouse wheel to zoom in/out';}
}" border="0" />如果你想格式化C盘,即选第二项进入DOS下,在提示符“A:>_”下输入“format c:”后回车,再输入“y”后回车即开如格式化C盘! 在这里我已经格式化C盘了,所以选第一项(从光盘安装98)后直接回车,很快出现如下图所示,(如果不选择在30秒后会自动启动第一项)。 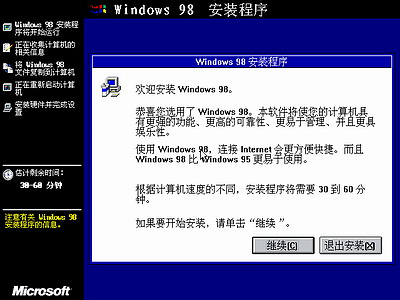 screen.width*0.7) {this.resized=true; this.width=screen.width*0.7; this.alt='Click here to open new window\nCTRL+Mouse wheel to zoom in/out';}
}" border="0" /> screen.width*0.7) {this.resized=true; this.width=screen.width*0.7; this.alt='Click here to open new window\nCTRL+Mouse wheel to zoom in/out';}
}" border="0" />一启动就 可以用鼠标了,中文界面, 点击“继续”按钮,出现如下图。  screen.width*0.7) {this.resized=true; this.width=screen.width*0.7; this.alt='Click here to open new window\nCTRL+Mouse wheel to zoom in/out';}
}" border="0" /> screen.width*0.7) {this.resized=true; this.width=screen.width*0.7; this.alt='Click here to open new window\nCTRL+Mouse wheel to zoom in/out';}
}" border="0" />正在准备Windows 98安装向导,很快结束,出现如下图所示。 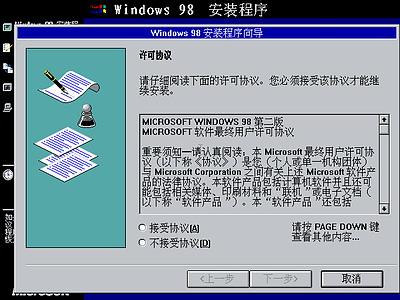 screen.width*0.7) {this.resized=true; this.width=screen.width*0.7; this.alt='Click here to open new window\nCTRL+Mouse wheel to zoom in/out';}
}" border="0" /> screen.width*0.7) {this.resized=true; this.width=screen.width*0.7; this.alt='Click here to open new window\nCTRL+Mouse wheel to zoom in/out';}
}" border="0" />许可协议当然是要接受啦!否则无法 安装。用鼠标移动光标到“接 受协议”前面的圆圈里点击一下使圆圈内多了一个黑点,然后点“下一步”出现如下图。  screen.width*0.7) {this.resized=true; this.width=screen.width*0.7; this.alt='Click here to open new window\nCTRL+Mouse wheel to zoom in/out';}
}" border="0" /> screen.width*0.7) {this.resized=true; this.width=screen.width*0.7; this.alt='Click here to open new window\nCTRL+Mouse wheel to zoom in/out';}
}" border="0" />这里选择安装系统文件所用的目录,默认是安装在C:WINDOWS,点“下一步”出现如下图。  screen.width*0.7) {this.resized=true; this.width=screen.width*0.7; this.alt='Click here to open new window\nCTRL+Mouse wheel to zoom in/out';}
}" border="0" /> screen.width*0.7) {this.resized=true; this.width=screen.width*0.7; this.alt='Click here to open new window\nCTRL+Mouse wheel to zoom in/out';}
}" border="0" />安装程序开始检查 所有硬盘,完成后 出现如下图所示。 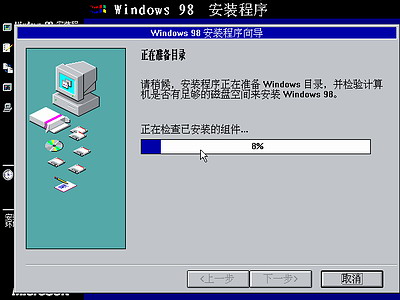 screen.width*0.7) {this.resized=true; this.width=screen.width*0.7; this.alt='Click here to open new window\nCTRL+Mouse wheel to zoom in/out';}
}" border="0" /> screen.width*0.7) {this.resized=true; this.width=screen.width*0.7; this.alt='Click here to open new window\nCTRL+Mouse wheel to zoom in/out';}
}" border="0" />开始检查磁盘中己安装的组件和准备安装系统所用目录,很快完成后出现如下图所示。  screen.width*0.7) {this.resized=true; this.width=screen.width*0.7; this.alt='Click here to open new window\nCTRL+Mouse wheel to zoom in/out';}
}" border="0" /> screen.width*0.7) {this.resized=true; this.width=screen.width*0.7; this.alt='Click here to open new window\nCTRL+Mouse wheel to zoom in/out';}
}" border="0" />检查可用磁盘空间,检查磁盘错误。 完成后出现如下图所示  screen.width*0.7) {this.resized=true; this.width=screen.width*0.7; this.alt='Click here to open new window\nCTRL+Mouse wheel to zoom in/out';}
}" border="0" /> screen.width*0.7) {this.resized=true; this.width=screen.width*0.7; this.alt='Click here to open new window\nCTRL+Mouse wheel to zoom in/out';}
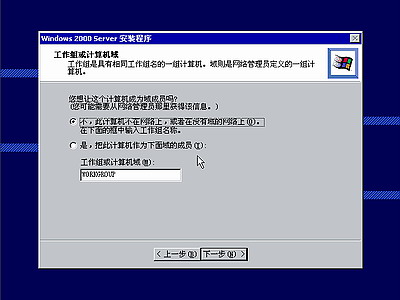
}" border="0" />如果你没有格式化C盘将会出现这幅图像。 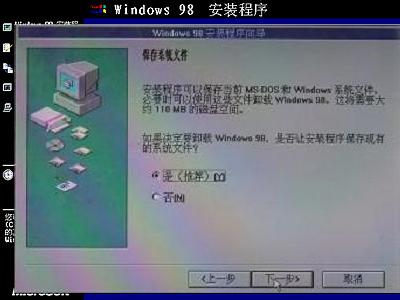 screen.width*0.7) {this.resized=true; this.width=screen.width*0.7; this.alt='Click here to open new window\nCTRL+Mouse wheel to zoom in/out';}
}" border="0" /> screen.width*0.7) {this.resized=true; this.width=screen.width*0.7; this.alt='Click here to open new window\nCTRL+Mouse wheel to zoom in/out';}
}" border="0" />选择地理位置,默认选中国,点“下一步”出现如下图。  screen.width*0.7) {this.resized=true; this.width=screen.width*0.7; this.alt='Click here to open new window\nCTRL+Mouse wheel to zoom in/out';}
}" border="0" /> screen.width*0.7) {this.resized=true; this.width=screen.width*0.7; this.alt='Click here to open new window\nCTRL+Mouse wheel to zoom in/out';}
}" border="0" />不论你是否想制作Windows 98启动盘,都要点“下一步”。  screen.width*0.7) {this.resized=true; this.width=screen.width*0.7; this.alt='Click here to open new window\nCTRL+Mouse wheel to zoom in/out';}
}" border="0" /> screen.width*0.7) {this.resized=true; this.width=screen.width*0.7; this.alt='Click here to open new window\nCTRL+Mouse wheel to zoom in/out';}
}" border="0" />如果你不想制作Windows 98启动盘请点击“取消”跳过这一步。建议你制作启动盘,请将取消了写保护的空白软盘放进软驱中,点击“确定”开始制作启动盘。  screen.width*0.7) {this.resized=true; this.width=screen.width*0.7; this.alt='Click here to open new window\nCTRL+Mouse wheel to zoom in/out';}
}" border="0" /> screen.width*0.7) {this.resized=true; this.width=screen.width*0.7; this.alt='Click here to open new window\nCTRL+Mouse wheel to zoom in/out';}
}" border="0" />正在制作98启动盘,完成后显示如下图(因软盘比较容易损坏,建议多制作一张启动盘备用)。  screen.width*0.7) {this.resized=true; this.width=screen.width*0.7; this.alt='Click here to open new window\nCTRL+Mouse wheel to zoom in/out';}
}" border="0" /> screen.width*0.7) {this.resized=true; this.width=screen.width*0.7; this.alt='Click here to open new window\nCTRL+Mouse wheel to zoom in/out';}
}" border="0" />取出刚制作的98启动软盘,然后单击“确定”。 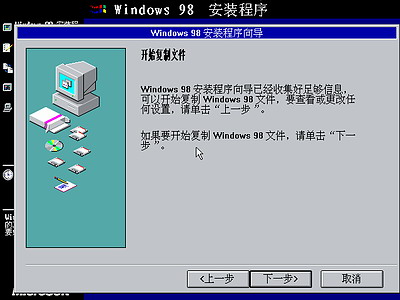 screen.width*0.7) {this.resized=true; this.width=screen.width*0.7; this.alt='Click here to open new window\nCTRL+Mouse wheel to zoom in/out';}
}" border="0" /> screen.width*0.7) {this.resized=true; this.width=screen.width*0.7; this.alt='Click here to open new window\nCTRL+Mouse wheel to zoom in/out';}
}" border="0" />这里点击“下一步”之后就没有上一步了,程序不可逆,没有回头的余地,点“下一步”没什么大不了的。  screen.width*0.7) {this.resized=true; this.width=screen.width*0.7; this.alt='Click here to open new window\nCTRL+Mouse wheel to zoom in/out';}
}" border="0" /> screen.width*0.7) {this.resized=true; this.width=screen.width*0.7; this.alt='Click here to open new window\nCTRL+Mouse wheel to zoom in/out';}
}" border="0" />开始复制所有文件?你可以去休息了,复制完成后如下图。 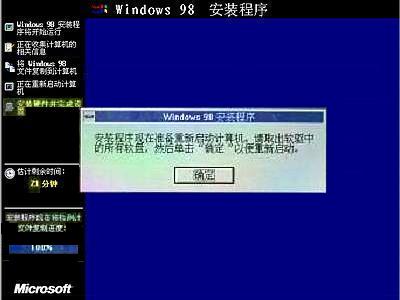 screen.width*0.7) {this.resized=true; this.width=screen.width*0.7; this.alt='Click here to open new window\nCTRL+Mouse wheel to zoom in/out';}
}" border="0" /> screen.width*0.7) {this.resized=true; this.width=screen.width*0.7; this.alt='Click here to open new window\nCTRL+Mouse wheel to zoom in/out';}
}" border="0" />如果你还没有取出软盘,请取出软盘后点“确定”。 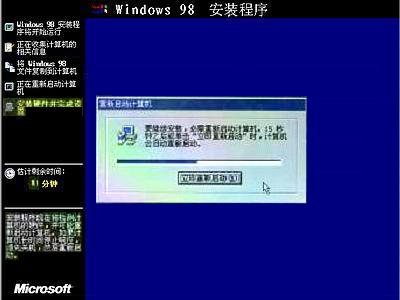 screen.width*0.7) {this.resized=true; this.width=screen.width*0.7; this.alt='Click here to open new window\nCTRL+Mouse wheel to zoom in/out';}
}" border="0" /> screen.width*0.7) {this.resized=true; this.width=screen.width*0.7; this.alt='Click here to open new window\nCTRL+Mouse wheel to zoom in/out';}
}" border="0" />系统将重新启动,启动时第一次出现Windows 98启动画面,启动完成后开始安装硬件,开始菜单,系统设置等等。其间会重新启动几次,你可以休息一下了,安装程序会自动完成余下的全部过程。见到如下图所示时即大功告成。 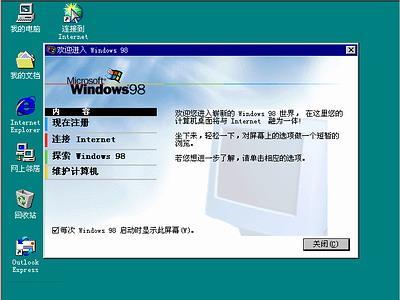 screen.width*0.7) {this.resized=true; this.width=screen.width*0.7; this.alt='Click here to open new window\nCTRL+Mouse wheel to zoom in/out';}
}" border="0" /> screen.width*0.7) {this.resized=true; this.width=screen.width*0.7; this.alt='Click here to open new window\nCTRL+Mouse wheel to zoom in/out';}
}" border="0" />四、结尾工作: 1.安装驱动程序,请参考--->驱动安装 2.设置上网连接,上网升级系统,进行系统设置 3.安装杀毒软件,升级杀毒软件,装程序等。 概括起来,结尾工作所用的时间比安装所用的时间长很多。建议大多数用户,装完系统及程序后优化一下系统,然后用系统备份工具(如Ghost中文伴侣等)将整个C盘备份为一个镜像文件(镜像文件大小约为整个C盘文件大小的1/3至1/4左右),以后如果系统损坏就可以用不到10分钟时间来恢复一个同备份时一模一样的全新系统。 [ 本帖最后由 mpf_hgsf 于 2006-12-2 18:25 编辑 ] |
 screen.width*0.7) {this.resized=true; this.width=screen.width*0.7; this.alt='Click here to open new window\nCTRL+Mouse wheel to zoom in/out';}
}" border="0" /> screen.width*0.7) {this.resized=true; this.width=screen.width*0.7; this.alt='Click here to open new window\nCTRL+Mouse wheel to zoom in/out';}
}" border="0" />就算错,我也错到底!我的空间,我的世界●★相遇衢州论坛★● ,我新建的论坛,绝无广告 |
引用 报告 回复  screen.width*0.7) {this.resized=true; this.width=screen.width*0.7; this.alt='Click here to open new window\nCTRL+Mouse wheel to zoom in/out';}
}" border="0" /> screen.width*0.7) {this.resized=true; this.width=screen.width*0.7; this.alt='Click here to open new window\nCTRL+Mouse wheel to zoom in/out';}
}" border="0" /> |
| jxzq007 (小光) 黑客大二  screen.width*0.7) {this.resized=true; this.width=screen.width*0.7; this.alt='Click here to open new window\nCTRL+Mouse wheel to zoom in/out';}
}" border="0" />screen.width*0.7) {this.resized=true; this.width=screen.width*0.7; this.alt='Click here to open new window\nCTRL+Mouse wheel to zoom in/out';}
}" border="0" /> screen.width*0.7) {this.resized=true; this.width=screen.width*0.7; this.alt='Click here to open new window\nCTRL+Mouse wheel to zoom in/out';}
}" border="0" />screen.width*0.7) {this.resized=true; this.width=screen.width*0.7; this.alt='Click here to open new window\nCTRL+Mouse wheel to zoom in/out';}
}" border="0" />一道温柔的小光
 screen.width*0.7) {this.resized=true; this.width=screen.width*0.7; this.alt='Click here to open new window\nCTRL+Mouse wheel to zoom in/out';}
}" border="0" /> screen.width*0.7) {this.resized=true; this.width=screen.width*0.7; this.alt='Click here to open new window\nCTRL+Mouse wheel to zoom in/out';}
}" border="0" /> UID 4846806 精华 2 积分 1692 帖子 626 威望 1260 金钱 185 阅读权限 60 注册 2004-12-14 来自 浙江 状态 离线 |
|

 screen.width*0.7) {this.resized=true; this.width=screen.width*0.7; this.alt='Click here to open new window\nCTRL+Mouse wheel to zoom in/out';}
}" border="0" />
screen.width*0.7) {this.resized=true; this.width=screen.width*0.7; this.alt='Click here to open new window\nCTRL+Mouse wheel to zoom in/out';}
}" border="0" /> screen.width*0.7) {this.resized=true; this.width=screen.width*0.7; this.alt='Click here to open new window\nCTRL+Mouse wheel to zoom in/out';}
}" border="0" />
screen.width*0.7) {this.resized=true; this.width=screen.width*0.7; this.alt='Click here to open new window\nCTRL+Mouse wheel to zoom in/out';}
}" border="0" />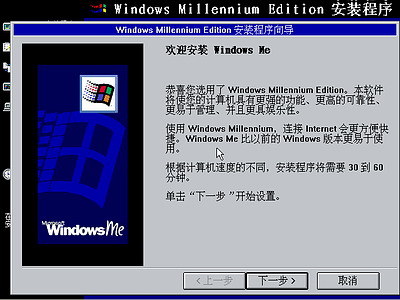 screen.width*0.7) {this.resized=true; this.width=screen.width*0.7; this.alt='Click here to open new window\nCTRL+Mouse wheel to zoom in/out';}
}" border="0" />
screen.width*0.7) {this.resized=true; this.width=screen.width*0.7; this.alt='Click here to open new window\nCTRL+Mouse wheel to zoom in/out';}
}" border="0" />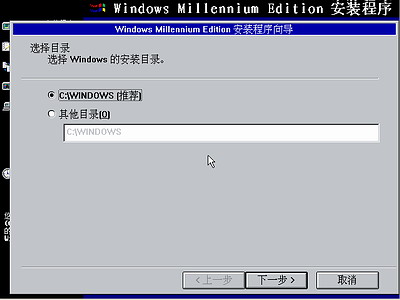 screen.width*0.7) {this.resized=true; this.width=screen.width*0.7; this.alt='Click here to open new window\nCTRL+Mouse wheel to zoom in/out';}
}" border="0" />
screen.width*0.7) {this.resized=true; this.width=screen.width*0.7; this.alt='Click here to open new window\nCTRL+Mouse wheel to zoom in/out';}
}" border="0" />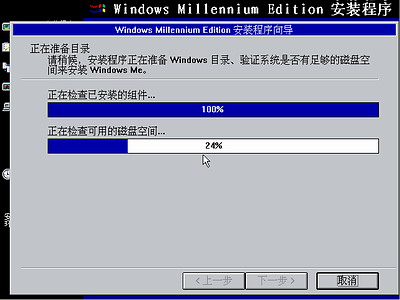 screen.width*0.7) {this.resized=true; this.width=screen.width*0.7; this.alt='Click here to open new window\nCTRL+Mouse wheel to zoom in/out';}
}" border="0" />
screen.width*0.7) {this.resized=true; this.width=screen.width*0.7; this.alt='Click here to open new window\nCTRL+Mouse wheel to zoom in/out';}
}" border="0" />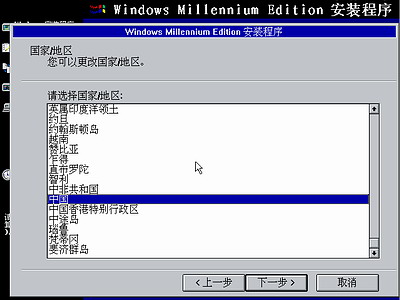 screen.width*0.7) {this.resized=true; this.width=screen.width*0.7; this.alt='Click here to open new window\nCTRL+Mouse wheel to zoom in/out';}
}" border="0" />
screen.width*0.7) {this.resized=true; this.width=screen.width*0.7; this.alt='Click here to open new window\nCTRL+Mouse wheel to zoom in/out';}
}" border="0" />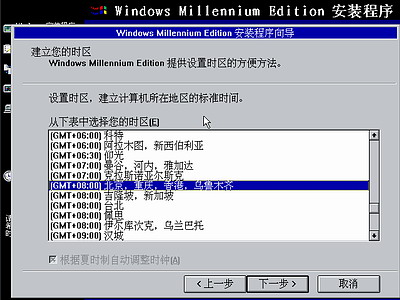 screen.width*0.7) {this.resized=true; this.width=screen.width*0.7; this.alt='Click here to open new window\nCTRL+Mouse wheel to zoom in/out';}
}" border="0" />
screen.width*0.7) {this.resized=true; this.width=screen.width*0.7; this.alt='Click here to open new window\nCTRL+Mouse wheel to zoom in/out';}
}" border="0" />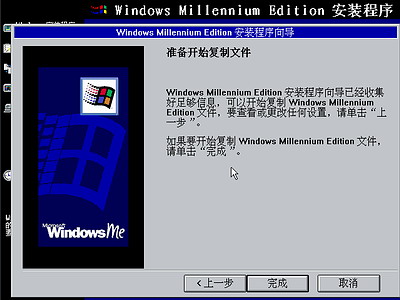 screen.width*0.7) {this.resized=true; this.width=screen.width*0.7; this.alt='Click here to open new window\nCTRL+Mouse wheel to zoom in/out';}
}" border="0" />
screen.width*0.7) {this.resized=true; this.width=screen.width*0.7; this.alt='Click here to open new window\nCTRL+Mouse wheel to zoom in/out';}
}" border="0" />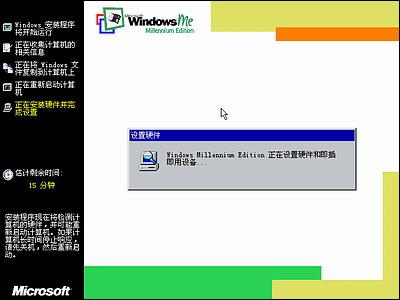 screen.width*0.7) {this.resized=true; this.width=screen.width*0.7; this.alt='Click here to open new window\nCTRL+Mouse wheel to zoom in/out';}
}" border="0" />
screen.width*0.7) {this.resized=true; this.width=screen.width*0.7; this.alt='Click here to open new window\nCTRL+Mouse wheel to zoom in/out';}
}" border="0" />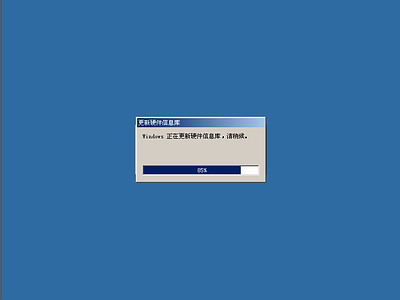 screen.width*0.7) {this.resized=true; this.width=screen.width*0.7; this.alt='Click here to open new window\nCTRL+Mouse wheel to zoom in/out';}
}" border="0" />
screen.width*0.7) {this.resized=true; this.width=screen.width*0.7; this.alt='Click here to open new window\nCTRL+Mouse wheel to zoom in/out';}
}" border="0" />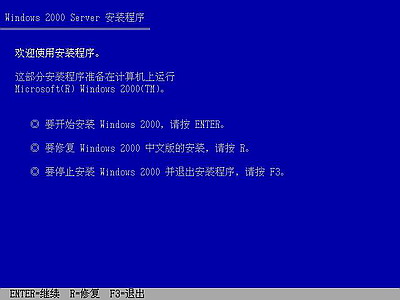 screen.width*0.7) {this.resized=true; this.width=screen.width*0.7; this.alt='Click here to open new window\nCTRL+Mouse wheel to zoom in/out';}
}" border="0" />
screen.width*0.7) {this.resized=true; this.width=screen.width*0.7; this.alt='Click here to open new window\nCTRL+Mouse wheel to zoom in/out';}
}" border="0" />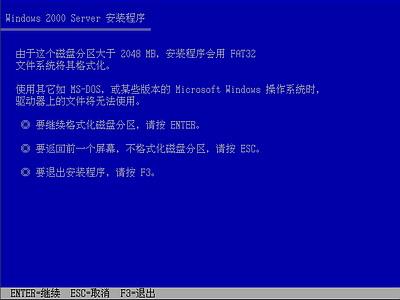 screen.width*0.7) {this.resized=true; this.width=screen.width*0.7; this.alt='Click here to open new window\nCTRL+Mouse wheel to zoom in/out';}
}" border="0" />
screen.width*0.7) {this.resized=true; this.width=screen.width*0.7; this.alt='Click here to open new window\nCTRL+Mouse wheel to zoom in/out';}
}" border="0" />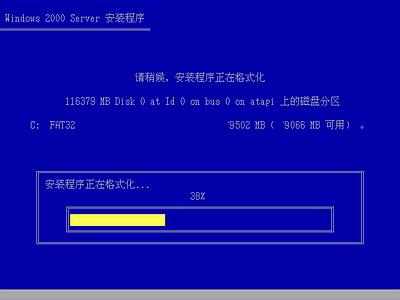 screen.width*0.7) {this.resized=true; this.width=screen.width*0.7; this.alt='Click here to open new window\nCTRL+Mouse wheel to zoom in/out';}
}" border="0" />
screen.width*0.7) {this.resized=true; this.width=screen.width*0.7; this.alt='Click here to open new window\nCTRL+Mouse wheel to zoom in/out';}
}" border="0" />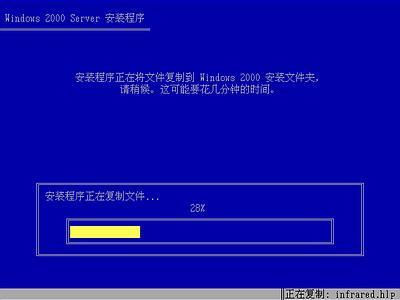 screen.width*0.7) {this.resized=true; this.width=screen.width*0.7; this.alt='Click here to open new window\nCTRL+Mouse wheel to zoom in/out';}
}" border="0" />
screen.width*0.7) {this.resized=true; this.width=screen.width*0.7; this.alt='Click here to open new window\nCTRL+Mouse wheel to zoom in/out';}
}" border="0" />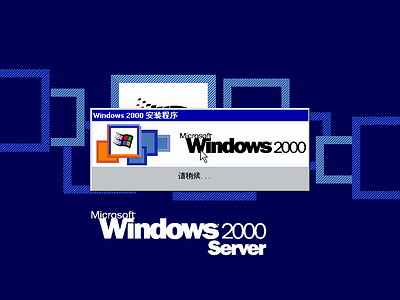 screen.width*0.7) {this.resized=true; this.width=screen.width*0.7; this.alt='Click here to open new window\nCTRL+Mouse wheel to zoom in/out';}
}" border="0" />
screen.width*0.7) {this.resized=true; this.width=screen.width*0.7; this.alt='Click here to open new window\nCTRL+Mouse wheel to zoom in/out';}
}" border="0" />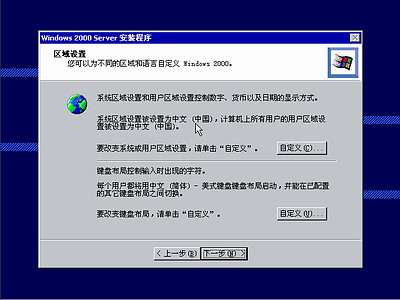 screen.width*0.7) {this.resized=true; this.width=screen.width*0.7; this.alt='Click here to open new window\nCTRL+Mouse wheel to zoom in/out';}
}" border="0" />
screen.width*0.7) {this.resized=true; this.width=screen.width*0.7; this.alt='Click here to open new window\nCTRL+Mouse wheel to zoom in/out';}
}" border="0" />