菜鸟成长手册—系统安装全接触 chaoren2007-09-27 21:06:16
chaoren2007-09-27 21:06:16
菜鸟成长手册—系统安装全接触
系统的安装问题是非常多菜鸟朋友初次接触电脑遇到的大问题,我找出了一些比较好的文章,希望能帮助大家解决日常安装系统的一些问题。
Windows XP篇:
一、准备工作:
1.准备好Windows XP Professional简体中文版安装光盘,并检查光驱是否支持自启动。
2.可能的情况下,在运行安装程序前用磁盘扫描程序扫描所有硬盘检查硬盘错误并进行修复,否则安装程序运行时如检查到有硬盘错误即会很麻烦。
3.用纸张记录安装文件的产品密匙(安装序列号)。
4.可能的情况下,用驱动程序备份工具(如:驱动精灵)将原Windows XP下的所有驱动程序备份到硬盘上(如∶F
rive)。最好能记蟲靼濉⑼?ā⑾钥ǖ戎饕?布?男秃偶吧??Ъ遥?は认略厍??绦虮赣谩?br /> 5.如果你想在安装过程中格式化C盘或D盘(建议安装过程中格式化C盘),请备份C盘或D盘有用的数据。
二、用光盘启动系统:
(如果你已经知道方法请转到下一步),重新启动系统并把光驱设为第一启动盘,保存设置并重启。将XP安装光盘放入光驱,重新启动电脑。刚启动时,当出现如下图?臼笨焖侔聪禄爻导??裨虿荒芷舳疿P系统光盘安装。
 screen.width*0.7) {this.resized=true; this.width=screen.width*0.7; this.alt='Click here to open new window\nCTRL+Mouse wheel to zoom in/out';}
}" border="0" />
screen.width*0.7) {this.resized=true; this.width=screen.width*0.7; this.alt='Click here to open new window\nCTRL+Mouse wheel to zoom in/out';}
}" border="0" />
三、安装Windows XP Professional
光盘自启动后,如无意外即可见到安装界面,将出现如下图所示。
 screen.width*0.7) {this.resized=true; this.width=screen.width*0.7; this.alt='Click here to open new window\nCTRL+Mouse wheel to zoom in/out';}
}" border="0" />
screen.width*0.7) {this.resized=true; this.width=screen.width*0.7; this.alt='Click here to open new window\nCTRL+Mouse wheel to zoom in/out';}
}" border="0" />
全中文提示,“要现在安装WindowsXP,请按ENTER”,按回车键。
 screen.width*0.7) {this.resized=true; this.width=screen.width*0.7; this.alt='Click here to open new window\nCTRL+Mouse wheel to zoom in/out';}
}" border="0" />
screen.width*0.7) {this.resized=true; this.width=screen.width*0.7; this.alt='Click here to open new window\nCTRL+Mouse wheel to zoom in/out';}
}" border="0" />
许可协议,这里没有选择的余地,按“F8”键。
 screen.width*0.7) {this.resized=true; this.width=screen.width*0.7; this.alt='Click here to open new window\nCTRL+Mouse wheel to zoom in/out';}
}" border="0" />
screen.width*0.7) {this.resized=true; this.width=screen.width*0.7; this.alt='Click here to open new window\nCTRL+Mouse wheel to zoom in/out';}
}" border="0" />
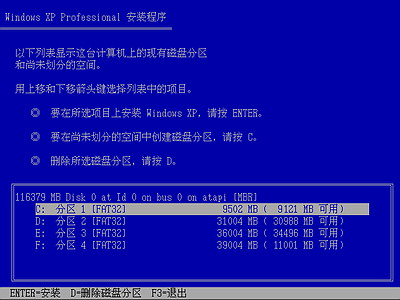
这里用“向下或向上”方向键选择安装系统所用的分区,如果你已格式化C盘请选择C分区,选择好分区后按“Enter”键回车。
 screen.width*0.7) {this.resized=true; this.width=screen.width*0.7; this.alt='Click here to open new window\nCTRL+Mouse wheel to zoom in/out';}
}" border="0" />
screen.width*0.7) {this.resized=true; this.width=screen.width*0.7; this.alt='Click here to open new window\nCTRL+Mouse wheel to zoom in/out';}
}" border="0" />
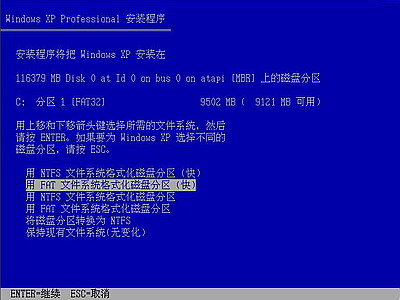
这里对所选分区可以进行格式化,从而转换文件系统格,或保存现有文件系统,有多种选择的余地,但要注意的是NTFS格式可节约磁盘空间提高安全xxx和减小磁盘碎片但同时存在很多问题OS和98/Me下看不到NTFS格式的分区,在这里选“用FAT文件系统格式化磁盘分区(快),按“Enter”键回车。
 screen.width*0.7) {this.resized=true; this.width=screen.width*0.7; this.alt='Click here to open new window\nCTRL+Mouse wheel to zoom in/out';}
}" border="0" />
screen.width*0.7) {this.resized=true; this.width=screen.width*0.7; this.alt='Click here to open new window\nCTRL+Mouse wheel to zoom in/out';}
}" border="0" />
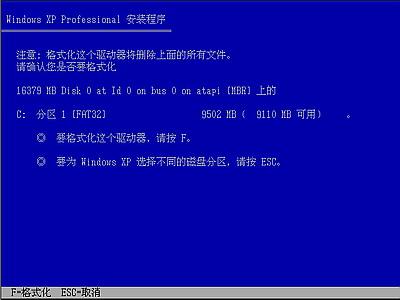
格式化C盘的警告,按F键将准备格式化c盘。
 screen.width*0.7) {this.resized=true; this.width=screen.width*0.7; this.alt='Click here to open new window\nCTRL+Mouse wheel to zoom in/out';}
}" border="0" />
screen.width*0.7) {this.resized=true; this.width=screen.width*0.7; this.alt='Click here to open new window\nCTRL+Mouse wheel to zoom in/out';}
}" border="0" />
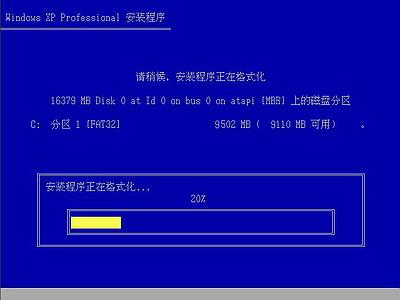
由于所选分区C的空间大于2048M(即2G),FAT文件系统不支持大于2048M的磁盘分区,所以安装程序会用FAT32文件系统格式对C盘进行格式化,按“Enter”键回车。
 screen.width*0.7) {this.resized=true; this.width=screen.width*0.7; this.alt='Click here to open new window\nCTRL+Mouse wheel to zoom in/out';}
}" border="0" />
screen.width*0.7) {this.resized=true; this.width=screen.width*0.7; this.alt='Click here to open new window\nCTRL+Mouse wheel to zoom in/out';}
}" border="0" />
只有用光盘启动或安装启动软盘启动XP安装程序,才能在安装过程中提供格式化分区选项;如果用MS-DOS启动盘启动进入DOS下,运行i386winnt进行安装XP时,安装XP时没有格式化分区选项。
 screen.width*0.7) {this.resized=true; this.width=screen.width*0.7; this.alt='Click here to open new window\nCTRL+Mouse wheel to zoom in/out';}
}" border="0" />
screen.width*0.7) {this.resized=true; this.width=screen.width*0.7; this.alt='Click here to open new window\nCTRL+Mouse wheel to zoom in/out';}
}" border="0" />
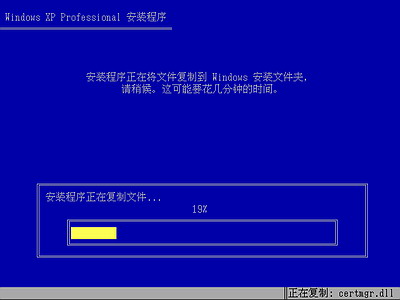
文件复制完后,安装程序开始初始化Windows配置。然后系统将会自动在15秒后重新启动。
 screen.width*0.7) {this.resized=true; this.width=screen.width*0.7; this.alt='Click here to open new window\nCTRL+Mouse wheel to zoom in/out';}
}" border="0" />
screen.width*0.7) {this.resized=true; this.width=screen.width*0.7; this.alt='Click here to open new window\nCTRL+Mouse wheel to zoom in/out';}
}" border="0" />
过5分钟后,当提示还需33分钟时将出现。
 screen.width*0.7) {this.resized=true; this.width=screen.width*0.7; this.alt='Click here to open new window\nCTRL+Mouse wheel to zoom in/out';}
}" border="0" />
screen.width*0.7) {this.resized=true; this.width=screen.width*0.7; this.alt='Click here to open new window\nCTRL+Mouse wheel to zoom in/out';}
}" border="0" />
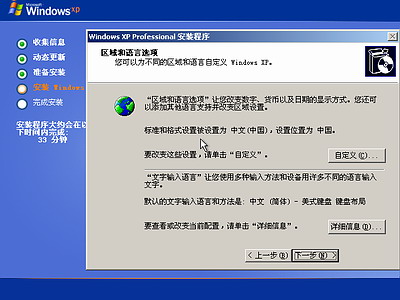
区域和语言设置选用默认值就可以了,直接点“下一步”按钮。
 screen.width*0.7) {this.resized=true; this.width=screen.width*0.7; this.alt='Click here to open new window\nCTRL+Mouse wheel to zoom in/out';}
}" border="0" />
screen.width*0.7) {this.resized=true; this.width=screen.width*0.7; this.alt='Click here to open new window\nCTRL+Mouse wheel to zoom in/out';}
}" border="0" />
这里输入你想好的姓名和单位,这里的姓名是你以后注册的用户名,点“下一步”按钮。
 screen.width*0.7) {this.resized=true; this.width=screen.width*0.7; this.alt='Click here to open new window\nCTRL+Mouse wheel to zoom in/out';}
}" border="0" />
screen.width*0.7) {this.resized=true; this.width=screen.width*0.7; this.alt='Click here to open new window\nCTRL+Mouse wheel to zoom in/out';}
}" border="0" />
如果你没觴xxは燃窍虏?访茉浚ò沧靶蛄泻牛┚痛蠹?吕玻≌饫锸淙氚沧靶蛄泻牛?恪跋乱徊健卑磁ァ?/font>
 screen.width*0.7) {this.resized=true; this.width=screen.width*0.7; this.alt='Click here to open new window\nCTRL+Mouse wheel to zoom in/out';}
}" border="0" />
screen.width*0.7) {this.resized=true; this.width=screen.width*0.7; this.alt='Click here to open new window\nCTRL+Mouse wheel to zoom in/out';}
}" border="0" />
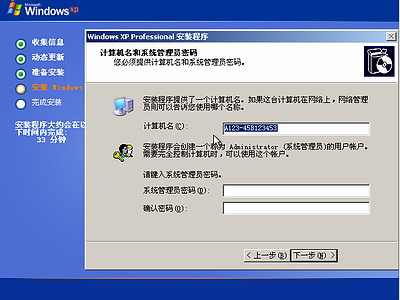
安装程序自动为你创建又长又难看的计算机名称,自己可任意更改,输入两次系统管理员密码,请记住这个密码,Administrator系统管理员在系统中具有最高权限,平时登陆系统不需要这个帐号。接着点“下一步”出现如下图。
 screen.width*0.7) {this.resized=true; this.width=screen.width*0.7; this.alt='Click here to open new window\nCTRL+Mouse wheel to zoom in/out';}
}" border="0" />
screen.width*0.7) {this.resized=true; this.width=screen.width*0.7; this.alt='Click here to open new window\nCTRL+Mouse wheel to zoom in/out';}
}" border="0" />
日期和时间设置不用讲,选北京时间,点“下一步”。
 screen.width*0.7) {this.resized=true; this.width=screen.width*0.7; this.alt='Click here to open new window\nCTRL+Mouse wheel to zoom in/out';}
}" border="0" />
screen.width*0.7) {this.resized=true; this.width=screen.width*0.7; this.alt='Click here to open new window\nCTRL+Mouse wheel to zoom in/out';}
}" border="0" />
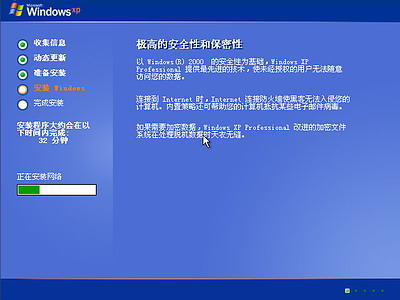
开始安装,复制系统文件、安装网络系统。
 screen.width*0.7) {this.resized=true; this.width=screen.width*0.7; this.alt='Click here to open new window\nCTRL+Mouse wheel to zoom in/out';}
}" border="0" />
screen.width*0.7) {this.resized=true; this.width=screen.width*0.7; this.alt='Click here to open new window\nCTRL+Mouse wheel to zoom in/out';}
}" border="0" />
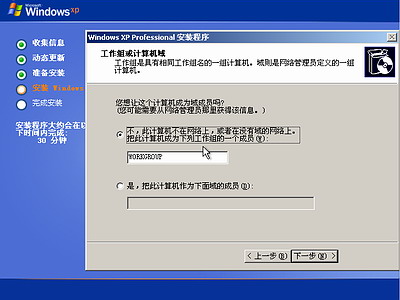
让你选择网络安装所用的方式,选典型设置点“下一步”。
 screen.width*0.7) {this.resized=true; this.width=screen.width*0.7; this.alt='Click here to open new window\nCTRL+Mouse wheel to zoom in/out';}
}" border="0" />
screen.width*0.7) {this.resized=true; this.width=screen.width*0.7; this.alt='Click here to open new window\nCTRL+Mouse wheel to zoom in/out';}
}" border="0" />
点“下一步”出现如下图。
 screen.width*0.7) {this.resized=true; this.width=screen.width*0.7; this.alt='Click here to open new window\nCTRL+Mouse wheel to zoom in/out';}
}" border="0" />
screen.width*0.7) {this.resized=true; this.width=screen.width*0.7; this.alt='Click here to open new window\nCTRL+Mouse wheel to zoom in/out';}
}" border="0" />
继续安装,到这里后就不用你参与了,安装程序会自动完成全过程。
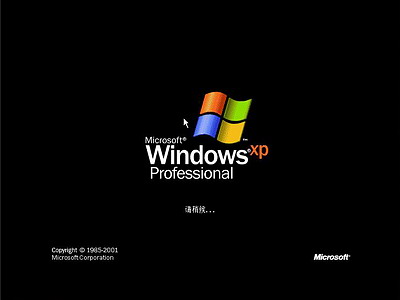
安装完成后自动重新启动,出现启动画面。
 screen.width*0.7) {this.resized=true; this.width=screen.width*0.7; this.alt='Click here to open new window\nCTRL+Mouse wheel to zoom in/out';}
}" border="0" />
screen.width*0.7) {this.resized=true; this.width=screen.width*0.7; this.alt='Click here to open new window\nCTRL+Mouse wheel to zoom in/out';}
}" border="0" />
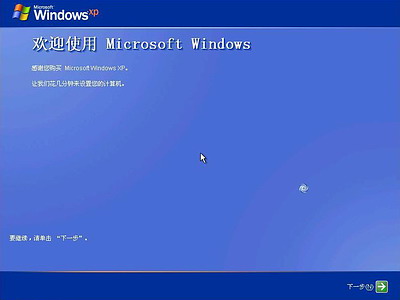
第一次启动需要较长时间,请耐心等候,接下来是欢迎使用画面,提示设置系统。
 screen.width*0.7) {this.resized=true; this.width=screen.width*0.7; this.alt='Click here to open new window\nCTRL+Mouse wheel to zoom in/out';}
}" border="0" />
screen.width*0.7) {this.resized=true; this.width=screen.width*0.7; this.alt='Click here to open new window\nCTRL+Mouse wheel to zoom in/out';}
}" border="0" />
点击右下角的“下一步”按钮,出现设置上网连接画面。
 screen.width*0.7) {this.resized=true; this.width=screen.width*0.7; this.alt='Click here to open new window\nCTRL+Mouse wheel to zoom in/out';}
}" border="0" />
screen.width*0.7) {this.resized=true; this.width=screen.width*0.7; this.alt='Click here to open new window\nCTRL+Mouse wheel to zoom in/out';}
}" border="0" />
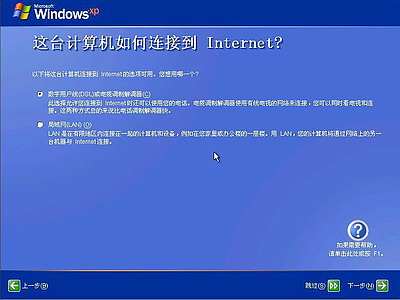
这里建立的宽带拨号连接,不会在桌面上建立拨号连接快捷方式,且默认的拨号连接名称为“我的ISP”(自定义除外);进入桌面后通过连接向导建立的宽带拨号连接,在桌面上会建立拨号连接快捷方式,且默认的拨号连接名称为“宽带连接”(自定义除外)。如果你不想在这里建立宽带拨号连接,请点击“跳过”按钮。
在这里我先创建一个宽带连接,选第一项“数字用户线(ADSL)或电缆调制解调器”,点击“下一步”按钮。
 screen.width*0.7) {this.resized=true; this.width=screen.width*0.7; this.alt='Click here to open new window\nCTRL+Mouse wheel to zoom in/out';}
}" border="0" />
screen.width*0.7) {this.resized=true; this.width=screen.width*0.7; this.alt='Click here to open new window\nCTRL+Mouse wheel to zoom in/out';}
}" border="0" />
目前使用的电信或联通(ADSL)住宅用户都有帐号和密码的,所以我选“是,我使用用户名和密码连接”,点击“下一步”按钮。
 screen.width*0.7) {this.resized=true; this.width=screen.width*0.7; this.alt='Click here to open new window\nCTRL+Mouse wheel to zoom in/out';}
}" border="0" />
screen.width*0.7) {this.resized=true; this.width=screen.width*0.7; this.alt='Click here to open new window\nCTRL+Mouse wheel to zoom in/out';}
}" border="0" />
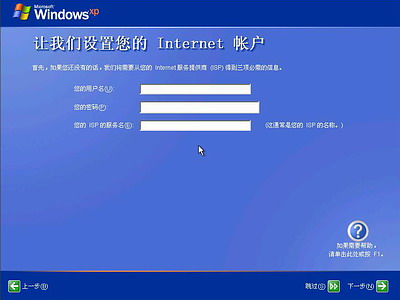
输入电信或联通提供的帐号和密码,在“你的ISP的服务名”处输入你喜欢的名称,该名称作为拨号连接快捷菜单的名称,如果留空系统会自动创建名为“我的ISP”作为该连接的名称,点击“下一步”按钮。
 screen.width*0.7) {this.resized=true; this.width=screen.width*0.7; this.alt='Click here to open new window\nCTRL+Mouse wheel to zoom in/out';}
}" border="0" />
screen.width*0.7) {this.resized=true; this.width=screen.width*0.7; this.alt='Click here to open new window\nCTRL+Mouse wheel to zoom in/out';}
}" border="0" />
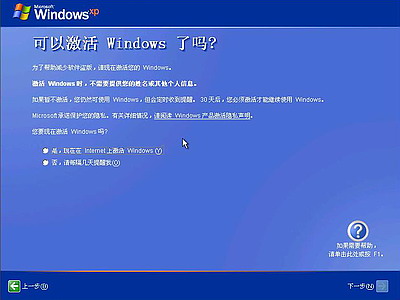
已经建立了拨号连接,微软当然想你现在就激活XP啦,不过即使不激活也有30天的试用期,又何必急呢?选择“否,请等候几天提醒我”,点击“下一步”按钮。
 screen.width*0.7) {this.resized=true; this.width=screen.width*0.7; this.alt='Click here to open new window\nCTRL+Mouse wheel to zoom in/out';}
}" border="0" />
screen.width*0.7) {this.resized=true; this.width=screen.width*0.7; this.alt='Click here to open new window\nCTRL+Mouse wheel to zoom in/out';}
}" border="0" />
输入一个你平时用来登陆计算机的用户名,点下一步。
 screen.width*0.7) {this.resized=true; this.width=screen.width*0.7; this.alt='Click here to open new window\nCTRL+Mouse wheel to zoom in/out';}
}" border="0" />
screen.width*0.7) {this.resized=true; this.width=screen.width*0.7; this.alt='Click here to open new window\nCTRL+Mouse wheel to zoom in/out';}
}" border="0" />
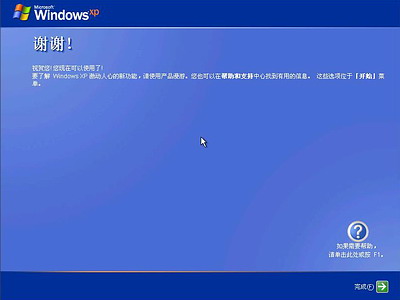
点击完成,就结束安装。系统将注销并重新以新用户身份登陆。登陆桌面。
 screen.width*0.7) {this.resized=true; this.width=screen.width*0.7; this.alt='Click here to open new window\nCTRL+Mouse wheel to zoom in/out';}
}" border="0" />
screen.width*0.7) {this.resized=true; this.width=screen.width*0.7; this.alt='Click here to open new window\nCTRL+Mouse wheel to zoom in/out';}
}" border="0" />
看到了蓝天白云的画面,你就知道是什么回事。可是桌面上就只有回收站一个图标。想找回常见的图标请看下面。
六、找回常见的图标
在桌面上点开始-->连接到-->宽带连接,如下图。
 screen.width*0.7) {this.resized=true; this.width=screen.width*0.7; this.alt='Click here to open new window\nCTRL+Mouse wheel to zoom in/out';}
}" border="0" />
screen.width*0.7) {this.resized=true; this.width=screen.width*0.7; this.alt='Click here to open new window\nCTRL+Mouse wheel to zoom in/out';}
}" border="0" />
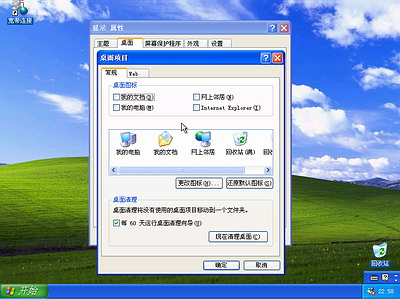
在图中的左下部点击“自定义桌面”按钮。
 screen.width*0.7) {this.resized=true; this.width=screen.width*0.7; this.alt='Click here to open new window\nCTRL+Mouse wheel to zoom in/out';}
}" border="0" />
screen.width*0.7) {this.resized=true; this.width=screen.width*0.7; this.alt='Click here to open new window\nCTRL+Mouse wheel to zoom in/out';}
}" border="0" />
在图中的上部,将“我的文档”、“我的电脑”、“网上邻居”和“InternetExplorer”四个项目前面的空格上打钩,然后点“确定”,再“确定”,你将会看到桌面上多了你想要的图标。
 screen.width*0.7) {this.resized=true; this.width=screen.width*0.7; this.alt='Click here to open new window\nCTRL+Mouse wheel to zoom in/out';}
}" border="0" />
screen.width*0.7) {this.resized=true; this.width=screen.width*0.7; this.alt='Click here to open new window\nCTRL+Mouse wheel to zoom in/out';}
}" border="0" />
有关其它方面的功能的设置方法请参考-->功能设置。
安装Windows 2000
Windows XP篇:
一、准备工作:
1.准备好Windows XP Professional简体中文版安装光盘,并检查光驱是否支持自启动。
2.可能的情况下,在运行安装程序前用磁盘扫描程序扫描所有硬盘检查硬盘错误并进行修复,否则安装程序运行时如检查到有硬盘错误即会很麻烦。
3.用纸张记录安装文件的产品密匙(安装序列号)。
4.可能的情况下,用驱动程序备份工具(如:驱动精灵)将原Windows XP下的所有驱动程序备份到硬盘上(如∶F
rive)。最好能记蟲靼濉⑼?ā⑾钥ǖ戎饕?布?男秃偶吧??Ъ遥?は认略厍??绦虮赣谩?br /> 5.如果你想在安装过程中格式化C盘或D盘(建议安装过程中格式化C盘),请备份C盘或D盘有用的数据。
二、用光盘启动系统:
(如果你已经知道方法请转到下一步),重新启动系统并把光驱设为第一启动盘,保存设置并重启。将XP安装光盘放入光驱,重新启动电脑。刚启动时,当出现如下图?臼笨焖侔聪禄爻导??裨虿荒芷舳疿P系统光盘安装。
screen.width*0.7) {this.resized=true; this.width=screen.width*0.7; this.alt='Click here to open new window\nCTRL+Mouse wheel to zoom in/out';}
}" border="0" />三、安装Windows XP Professional
光盘自启动后,如无意外即可见到安装界面,将出现如下图所示。
screen.width*0.7) {this.resized=true; this.width=screen.width*0.7; this.alt='Click here to open new window\nCTRL+Mouse wheel to zoom in/out';}
}" border="0" />全中文提示,“要现在安装WindowsXP,请按ENTER”,按回车键。
screen.width*0.7) {this.resized=true; this.width=screen.width*0.7; this.alt='Click here to open new window\nCTRL+Mouse wheel to zoom in/out';}
}" border="0" />许可协议,这里没有选择的余地,按“F8”键。
screen.width*0.7) {this.resized=true; this.width=screen.width*0.7; this.alt='Click here to open new window\nCTRL+Mouse wheel to zoom in/out';}
}" border="0" />这里用“向下或向上”方向键选择安装系统所用的分区,如果你已格式化C盘请选择C分区,选择好分区后按“Enter”键回车。
screen.width*0.7) {this.resized=true; this.width=screen.width*0.7; this.alt='Click here to open new window\nCTRL+Mouse wheel to zoom in/out';}
}" border="0" />这里对所选分区可以进行格式化,从而转换文件系统格,或保存现有文件系统,有多种选择的余地,但要注意的是NTFS格式可节约磁盘空间提高安全xxx和减小磁盘碎片但同时存在很多问题OS和98/Me下看不到NTFS格式的分区,在这里选“用FAT文件系统格式化磁盘分区(快),按“Enter”键回车。
screen.width*0.7) {this.resized=true; this.width=screen.width*0.7; this.alt='Click here to open new window\nCTRL+Mouse wheel to zoom in/out';}
}" border="0" />格式化C盘的警告,按F键将准备格式化c盘。
screen.width*0.7) {this.resized=true; this.width=screen.width*0.7; this.alt='Click here to open new window\nCTRL+Mouse wheel to zoom in/out';}
}" border="0" />由于所选分区C的空间大于2048M(即2G),FAT文件系统不支持大于2048M的磁盘分区,所以安装程序会用FAT32文件系统格式对C盘进行格式化,按“Enter”键回车。
screen.width*0.7) {this.resized=true; this.width=screen.width*0.7; this.alt='Click here to open new window\nCTRL+Mouse wheel to zoom in/out';}
}" border="0" />只有用光盘启动或安装启动软盘启动XP安装程序,才能在安装过程中提供格式化分区选项;如果用MS-DOS启动盘启动进入DOS下,运行i386winnt进行安装XP时,安装XP时没有格式化分区选项。
screen.width*0.7) {this.resized=true; this.width=screen.width*0.7; this.alt='Click here to open new window\nCTRL+Mouse wheel to zoom in/out';}
}" border="0" />文件复制完后,安装程序开始初始化Windows配置。然后系统将会自动在15秒后重新启动。
screen.width*0.7) {this.resized=true; this.width=screen.width*0.7; this.alt='Click here to open new window\nCTRL+Mouse wheel to zoom in/out';}
}" border="0" />过5分钟后,当提示还需33分钟时将出现。
screen.width*0.7) {this.resized=true; this.width=screen.width*0.7; this.alt='Click here to open new window\nCTRL+Mouse wheel to zoom in/out';}
}" border="0" />区域和语言设置选用默认值就可以了,直接点“下一步”按钮。
screen.width*0.7) {this.resized=true; this.width=screen.width*0.7; this.alt='Click here to open new window\nCTRL+Mouse wheel to zoom in/out';}
}" border="0" />这里输入你想好的姓名和单位,这里的姓名是你以后注册的用户名,点“下一步”按钮。
screen.width*0.7) {this.resized=true; this.width=screen.width*0.7; this.alt='Click here to open new window\nCTRL+Mouse wheel to zoom in/out';}
}" border="0" />如果你没觴xxは燃窍虏?访茉浚ò沧靶蛄泻牛┚痛蠹?吕玻≌饫锸淙氚沧靶蛄泻牛?恪跋乱徊健卑磁ァ?/font>
screen.width*0.7) {this.resized=true; this.width=screen.width*0.7; this.alt='Click here to open new window\nCTRL+Mouse wheel to zoom in/out';}
}" border="0" />安装程序自动为你创建又长又难看的计算机名称,自己可任意更改,输入两次系统管理员密码,请记住这个密码,Administrator系统管理员在系统中具有最高权限,平时登陆系统不需要这个帐号。接着点“下一步”出现如下图。
screen.width*0.7) {this.resized=true; this.width=screen.width*0.7; this.alt='Click here to open new window\nCTRL+Mouse wheel to zoom in/out';}
}" border="0" />日期和时间设置不用讲,选北京时间,点“下一步”。
screen.width*0.7) {this.resized=true; this.width=screen.width*0.7; this.alt='Click here to open new window\nCTRL+Mouse wheel to zoom in/out';}
}" border="0" />开始安装,复制系统文件、安装网络系统。
screen.width*0.7) {this.resized=true; this.width=screen.width*0.7; this.alt='Click here to open new window\nCTRL+Mouse wheel to zoom in/out';}
}" border="0" />让你选择网络安装所用的方式,选典型设置点“下一步”。
screen.width*0.7) {this.resized=true; this.width=screen.width*0.7; this.alt='Click here to open new window\nCTRL+Mouse wheel to zoom in/out';}
}" border="0" />点“下一步”出现如下图。
screen.width*0.7) {this.resized=true; this.width=screen.width*0.7; this.alt='Click here to open new window\nCTRL+Mouse wheel to zoom in/out';}
}" border="0" />继续安装,到这里后就不用你参与了,安装程序会自动完成全过程。
安装完成后自动重新启动,出现启动画面。
screen.width*0.7) {this.resized=true; this.width=screen.width*0.7; this.alt='Click here to open new window\nCTRL+Mouse wheel to zoom in/out';}
}" border="0" />第一次启动需要较长时间,请耐心等候,接下来是欢迎使用画面,提示设置系统。
screen.width*0.7) {this.resized=true; this.width=screen.width*0.7; this.alt='Click here to open new window\nCTRL+Mouse wheel to zoom in/out';}
}" border="0" />点击右下角的“下一步”按钮,出现设置上网连接画面。
screen.width*0.7) {this.resized=true; this.width=screen.width*0.7; this.alt='Click here to open new window\nCTRL+Mouse wheel to zoom in/out';}
}" border="0" />这里建立的宽带拨号连接,不会在桌面上建立拨号连接快捷方式,且默认的拨号连接名称为“我的ISP”(自定义除外);进入桌面后通过连接向导建立的宽带拨号连接,在桌面上会建立拨号连接快捷方式,且默认的拨号连接名称为“宽带连接”(自定义除外)。如果你不想在这里建立宽带拨号连接,请点击“跳过”按钮。
在这里我先创建一个宽带连接,选第一项“数字用户线(ADSL)或电缆调制解调器”,点击“下一步”按钮。
screen.width*0.7) {this.resized=true; this.width=screen.width*0.7; this.alt='Click here to open new window\nCTRL+Mouse wheel to zoom in/out';}
}" border="0" />目前使用的电信或联通(ADSL)住宅用户都有帐号和密码的,所以我选“是,我使用用户名和密码连接”,点击“下一步”按钮。
screen.width*0.7) {this.resized=true; this.width=screen.width*0.7; this.alt='Click here to open new window\nCTRL+Mouse wheel to zoom in/out';}
}" border="0" />输入电信或联通提供的帐号和密码,在“你的ISP的服务名”处输入你喜欢的名称,该名称作为拨号连接快捷菜单的名称,如果留空系统会自动创建名为“我的ISP”作为该连接的名称,点击“下一步”按钮。
screen.width*0.7) {this.resized=true; this.width=screen.width*0.7; this.alt='Click here to open new window\nCTRL+Mouse wheel to zoom in/out';}
}" border="0" />已经建立了拨号连接,微软当然想你现在就激活XP啦,不过即使不激活也有30天的试用期,又何必急呢?选择“否,请等候几天提醒我”,点击“下一步”按钮。
screen.width*0.7) {this.resized=true; this.width=screen.width*0.7; this.alt='Click here to open new window\nCTRL+Mouse wheel to zoom in/out';}
}" border="0" />输入一个你平时用来登陆计算机的用户名,点下一步。
screen.width*0.7) {this.resized=true; this.width=screen.width*0.7; this.alt='Click here to open new window\nCTRL+Mouse wheel to zoom in/out';}
}" border="0" />点击完成,就结束安装。系统将注销并重新以新用户身份登陆。登陆桌面。
screen.width*0.7) {this.resized=true; this.width=screen.width*0.7; this.alt='Click here to open new window\nCTRL+Mouse wheel to zoom in/out';}
}" border="0" />看到了蓝天白云的画面,你就知道是什么回事。可是桌面上就只有回收站一个图标。想找回常见的图标请看下面。
六、找回常见的图标
在桌面上点开始-->连接到-->宽带连接,如下图。
screen.width*0.7) {this.resized=true; this.width=screen.width*0.7; this.alt='Click here to open new window\nCTRL+Mouse wheel to zoom in/out';}
}" border="0" />在图中的左下部点击“自定义桌面”按钮。
screen.width*0.7) {this.resized=true; this.width=screen.width*0.7; this.alt='Click here to open new window\nCTRL+Mouse wheel to zoom in/out';}
}" border="0" />在图中的上部,将“我的文档”、“我的电脑”、“网上邻居”和“InternetExplorer”四个项目前面的空格上打钩,然后点“确定”,再“确定”,你将会看到桌面上多了你想要的图标。
screen.width*0.7) {this.resized=true; this.width=screen.width*0.7; this.alt='Click here to open new window\nCTRL+Mouse wheel to zoom in/out';}
}" border="0" />有关其它方面的功能的设置方法请参考-->功能设置。
安装Windows 2000
windows 2000 server篇:
一、准备工作:
1.准备好Windows 2000 server简体中文版安装光盘,并检查光驱是否支持自启动。
2.可能的情况下,在运行安装程序前用磁盘扫描程序扫描所有硬盘检查硬盘错误并进行修复,否则安装程序运行时如检查到有硬盘错误即会很麻烦。
3.用纸张记录安装文件的产品密匙(安装序列号)。
4.可能的情况下,用驱动程序备份工具(如:驱动精灵)将原Windows 2000下的所有驱动程序备份到硬盘上(如∶Frive)。最好能记蟲靼濉⑼?ā⑾钥ǖ戎饕?布?男秃偶吧??Ъ遥?は认略厍??绦虮赣谩?br /> 5.如果你想在安装过程中格式化C盘或D盘(建议安装过程中格式化C盘),请备份C盘或D盘有用的数据。
二、用光盘启动系统:
(如果你已经知道方法请转到下一步),将2000安装光盘放入光驱,重新启动系统并把光驱设为第一启动盘,保存设置并重启,如无意外即可见到安装界面:
三、安装Windows 2000 server
光盘自启动后,如无意外即可见到安装界面,将出现如下图所示。
 screen.width*0.7) {this.resized=true; this.width=screen.width*0.7; this.alt='Click here to open new window\nCTRL+Mouse wheel to zoom in/out';}
}" border="0" />
screen.width*0.7) {this.resized=true; this.width=screen.width*0.7; this.alt='Click here to open new window\nCTRL+Mouse wheel to zoom in/out';}
}" border="0" />
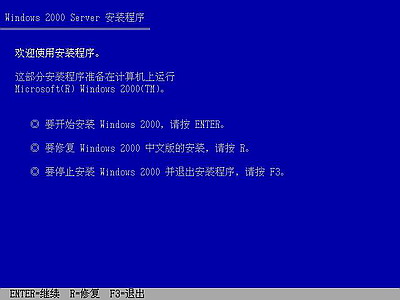
这一步有三个选项“1.要开始安装Windows 2000,请按ENTER;2.要修复Windows 2000中文版的安装,请按R3。要停止安装Windows 2000并退出安装程序,请按F3”在这里我们选第一项按“Enter”键回车,出现下图所示。
 screen.width*0.7) {this.resized=true; this.width=screen.width*0.7; this.alt='Click here to open new window\nCTRL+Mouse wheel to zoom in/out';}
}" border="0" />
screen.width*0.7) {this.resized=true; this.width=screen.width*0.7; this.alt='Click here to open new window\nCTRL+Mouse wheel to zoom in/out';}
}" border="0" />
许可协议,这里没有选择的余地,按“F8”。
 screen.width*0.7) {this.resized=true; this.width=screen.width*0.7; this.alt='Click here to open new window\nCTRL+Mouse wheel to zoom in/out';}
}" border="0" />
screen.width*0.7) {this.resized=true; this.width=screen.width*0.7; this.alt='Click here to open new window\nCTRL+Mouse wheel to zoom in/out';}
}" border="0" />
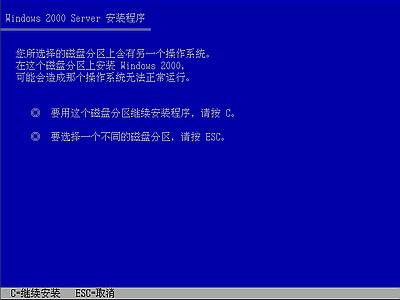
这里用“向下或向上”箭头键选择安装系统所用的分区,选择好分区后按“Enter”键回车,安装程序将检查所选分区,如果这个分区己经安装了另一个系统会出现下图。
 screen.width*0.7) {this.resized=true; this.width=screen.width*0.7; this.alt='Click here to open new window\nCTRL+Mouse wheel to zoom in/out';}
}" border="0" />
screen.width*0.7) {this.resized=true; this.width=screen.width*0.7; this.alt='Click here to open new window\nCTRL+Mouse wheel to zoom in/out';}
}" border="0" />
要使用所选的分区安装,按“C”键。
 screen.width*0.7) {this.resized=true; this.width=screen.width*0.7; this.alt='Click here to open new window\nCTRL+Mouse wheel to zoom in/out';}
}" border="0" />
screen.width*0.7) {this.resized=true; this.width=screen.width*0.7; this.alt='Click here to open new window\nCTRL+Mouse wheel to zoom in/out';}
}" border="0" />
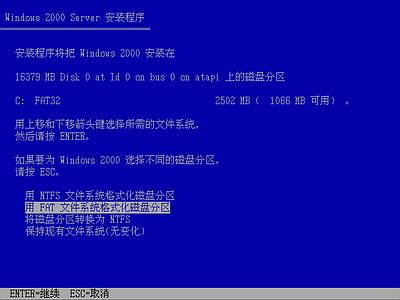
这里对所选分区可以进行格式化,从而转换文件系统格式,或保存现有文件系统,有多种选择的余地,但要注意的是NTFS格式可节约磁盘空间提高安全xxx和减小磁盘碎片但同时存在很多问题OS和98/Me下看不到NTFS格式的分区(这儿既然是Server,个人强烈推荐选择NTFS),在这里选“用FAT文件系统格式化磁盘分区”,按“Enter”键。
格式化所选分区C盘的警告,按F键将准备格式化c盘。
 screen.width*0.7) {this.resized=true; this.width=screen.width*0.7; this.alt='Click here to open new window\nCTRL+Mouse wheel to zoom in/out';}
}" border="0" />
screen.width*0.7) {this.resized=true; this.width=screen.width*0.7; this.alt='Click here to open new window\nCTRL+Mouse wheel to zoom in/out';}
}" border="0" />
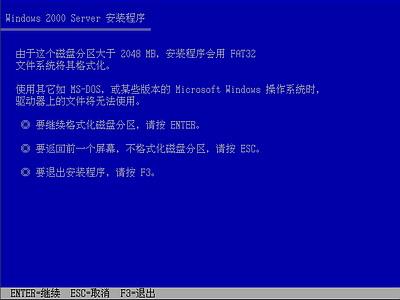
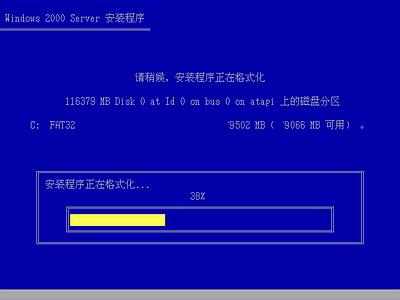
由于所选分区C的空间大于2048M(即2G),FAT文件系统不支持大于2048M的磁盘分区,所以安装程序会用FAT32文件系统格式对C盘进行格式化,按“Enter”键回车。
 screen.width*0.7) {this.resized=true; this.width=screen.width*0.7; this.alt='Click here to open new window\nCTRL+Mouse wheel to zoom in/out';}
}" border="0" />
screen.width*0.7) {this.resized=true; this.width=screen.width*0.7; this.alt='Click here to open new window\nCTRL+Mouse wheel to zoom in/out';}
}" border="0" />
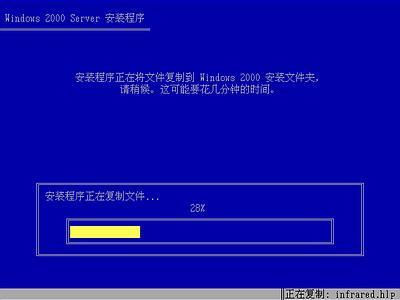
只有用光盘启动或安装启动软盘启动Windows 2000安装程序,才能在安装过程中提供格式化分区选项;如果用MS-DOS启动盘启动进入DOS下,运行i386winnt进行安装Windows 2000时,安装Windows 2000时没有格式化分区选项。格式化C分区完成后,安装程序开始从光盘中复制文件。
 screen.width*0.7) {this.resized=true; this.width=screen.width*0.7; this.alt='Click here to open new window\nCTRL+Mouse wheel to zoom in/out';}
}" border="0" />
screen.width*0.7) {this.resized=true; this.width=screen.width*0.7; this.alt='Click here to open new window\nCTRL+Mouse wheel to zoom in/out';}
}" border="0" />
复制完文件后,复制完文件后系统将会自动在15秒后重新启动,这时要注意了,请在系统重启时
将硬盘设为
第一启动盘或者临时取出安装光盘启动后再放入,使系统不至于进入死循环又重新启动安装程序。
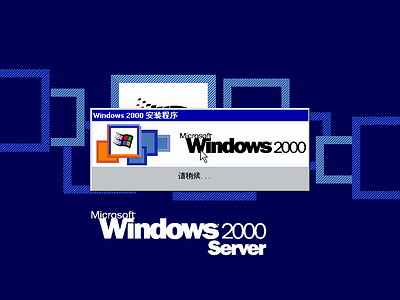
重新启动后,首次出现2000启动画面。
 screen.width*0.7) {this.resized=true; this.width=screen.width*0.7; this.alt='Click here to open new window\nCTRL+Mouse wheel to zoom in/out';}
}" border="0" />
screen.width*0.7) {this.resized=true; this.width=screen.width*0.7; this.alt='Click here to open new window\nCTRL+Mouse wheel to zoom in/out';}
}" border="0" />
启动后开始检测设备和安装设备,其间会黑屏二次,这是正常的,完成后出现如下图所示。
 screen.width*0.7) {this.resized=true; this.width=screen.width*0.7; this.alt='Click here to open new window\nCTRL+Mouse wheel to zoom in/out';}
}" border="0" />
screen.width*0.7) {this.resized=true; this.width=screen.width*0.7; this.alt='Click here to open new window\nCTRL+Mouse wheel to zoom in/out';}
}" border="0" />
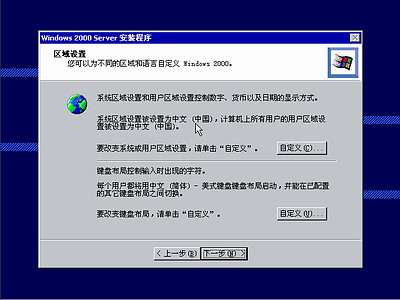
区域和语言设置选用默认值就可以了,直接点“下一步”按钮。
 screen.width*0.7) {this.resized=true; this.width=screen.width*0.7; this.alt='Click here to open new window\nCTRL+Mouse wheel to zoom in/out';}
}" border="0" />
screen.width*0.7) {this.resized=true; this.width=screen.width*0.7; this.alt='Click here to open new window\nCTRL+Mouse wheel to zoom in/out';}
}" border="0" />
这里任意输入你想好的姓名和单位,点“下一步”按钮。
 screen.width*0.7) {this.resized=true; this.width=screen.width*0.7; this.alt='Click here to open new window\nCTRL+Mouse wheel to zoom in/out';}
}" border="0" />
screen.width*0.7) {this.resized=true; this.width=screen.width*0.7; this.alt='Click here to open new window\nCTRL+Mouse wheel to zoom in/out';}
}" border="0" />
如果你没觴xxは燃窍虏?访茉浚ò沧靶蛄泻牛┚痛蠹?吕玻≌饫锸淙氚沧靶蛄泻湃纭肏6TWQ-TQQM8-HXJYG-D69F7-R84VM,点“下一步”按钮。
 screen.width*0.7) {this.resized=true; this.width=screen.width*0.7; this.alt='Click here to open new window\nCTRL+Mouse wheel to zoom in/out';}
}" border="0" />
screen.width*0.7) {this.resized=true; this.width=screen.width*0.7; this.alt='Click here to open new window\nCTRL+Mouse wheel to zoom in/out';}
}" border="0" />
在这里你可以根据需要任选一项,
想配置成服务器选第一
项,配置成工作站选第二项(同Windows 2003一样),选择后按“下一步”。
 screen.width*0.7) {this.resized=true; this.width=screen.width*0.7; this.alt='Click here to open new window\nCTRL+Mouse wheel to zoom in/out';}
}" border="0" />
screen.width*0.7) {this.resized=true; this.width=screen.width*0.7; this.alt='Click here to open new window\nCTRL+Mouse wheel to zoom in/out';}
}" border="0" />
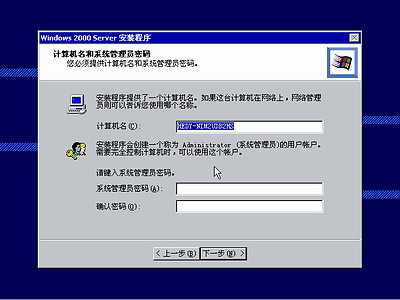
计算机名称自己任意输入默认
作为服务器名,输入两
次系统管理员密码,请记住这个密码,登陆时用。
 screen.width*0.7) {this.resized=true; this.width=screen.width*0.7; this.alt='Click here to open new window\nCTRL+Mouse wheel to zoom in/out';}
}" border="0" />
screen.width*0.7) {this.resized=true; this.width=screen.width*0.7; this.alt='Click here to open new window\nCTRL+Mouse wheel to zoom in/out';}
}" border="0" />
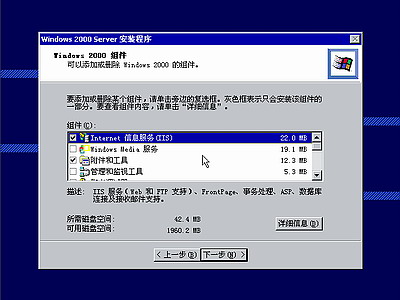
出现组件选项,根据需要选择,亦可以在安装完成后可在添加/删除里更改,点“下一步”继续。
 screen.width*0.7) {this.resized=true; this.width=screen.width*0.7; this.alt='Click here to open new window\nCTRL+Mouse wheel to zoom in/out';}
}" border="0" />
screen.width*0.7) {this.resized=true; this.width=screen.width*0.7; this.alt='Click here to open new window\nCTRL+Mouse wheel to zoom in/out';}
}" border="0" />
日期和时间设置不用讲了,点“下一步”,接着开始安装网络。
 screen.width*0.7) {this.resized=true; this.width=screen.width*0.7; this.alt='Click here to open new window\nCTRL+Mouse wheel to zoom in/out';}
}" border="0" />
screen.width*0.7) {this.resized=true; this.width=screen.width*0.7; this.alt='Click here to open new window\nCTRL+Mouse wheel to zoom in/out';}
}" border="0" />
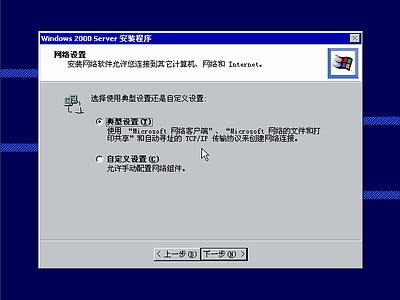
网络设置选“典型”即可,点“下一步”。
 screen.width*0.7) {this.resized=true; this.width=screen.width*0.7; this.alt='Click here to open new window\nCTRL+Mouse wheel to zoom in/out';}
}" border="0" />
screen.width*0.7) {this.resized=true; this.width=screen.width*0.7; this.alt='Click here to open new window\nCTRL+Mouse wheel to zoom in/out';}
}" border="0" />
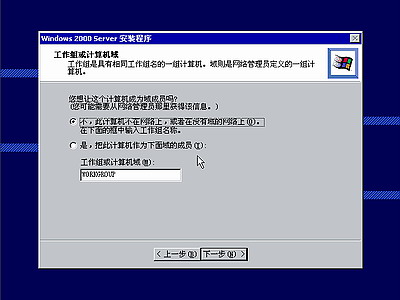
点“下一步”,开始安装组件、保存设置、删除用过的临时文件。
 screen.width*0.7) {this.resized=true; this.width=screen.width*0.7; this.alt='Click here to open new window\nCTRL+Mouse wheel to zoom in/out';}
}" border="0" />
screen.width*0.7) {this.resized=true; this.width=screen.width*0.7; this.alt='Click here to open new window\nCTRL+Mouse wheel to zoom in/out';}
}" border="0" />
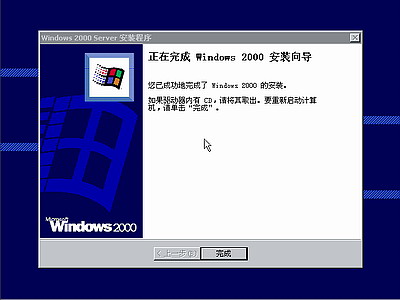
点击“完成”按钮完成全部安装过程,系统重新启动。
 screen.width*0.7) {this.resized=true; this.width=screen.width*0.7; this.alt='Click here to open new window\nCTRL+Mouse wheel to zoom in/out';}
}" border="0" />
screen.width*0.7) {this.resized=true; this.width=screen.width*0.7; this.alt='Click here to open new window\nCTRL+Mouse wheel to zoom in/out';}
}" border="0" />
按Ctrl+Alt+Delete组合键启动系统。
 screen.width*0.7) {this.resized=true; this.width=screen.width*0.7; this.alt='Click here to open new window\nCTRL+Mouse wheel to zoom in/out';}
}" border="0" />
screen.width*0.7) {this.resized=true; this.width=screen.width*0.7; this.alt='Click here to open new window\nCTRL+Mouse wheel to zoom in/out';}
}" border="0" />
输入你安装时设置的密码。
 screen.width*0.7) {this.resized=true; this.width=screen.width*0.7; this.alt='Click here to open new window\nCTRL+Mouse wheel to zoom in/out';}
}" border="0" />
screen.width*0.7) {this.resized=true; this.width=screen.width*0.7; this.alt='Click here to open new window\nCTRL+Mouse wheel to zoom in/out';}
}" border="0" />
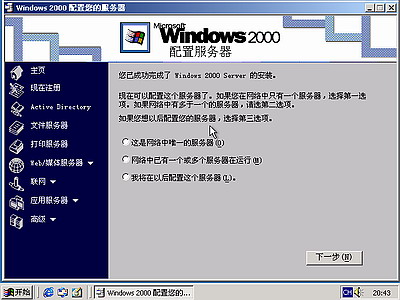
如果你不想配置
你的服务器,可以
以后再配置,直接点“下一步”,将出现桌面。
 screen.width*0.7) {this.resized=true; this.width=screen.width*0.7; this.alt='Click here to open new window\nCTRL+Mouse wheel to zoom in/out';}
}" border="0" />
screen.width*0.7) {this.resized=true; this.width=screen.width*0.7; this.alt='Click here to open new window\nCTRL+Mouse wheel to zoom in/out';}
}" border="0" />
将“启动时显示该屏幕”前面的勾取消,下次启动就不会出现该窗口了,直接关闭窗口。
 screen.width*0.7) {this.resized=true; this.width=screen.width*0.7; this.alt='Click here to open new window\nCTRL+Mouse wheel to zoom in/out';}
}" border="0" />
screen.width*0.7) {this.resized=true; this.width=screen.width*0.7; this.alt='Click here to open new window\nCTRL+Mouse wheel to zoom in/out';}
}" border="0" />
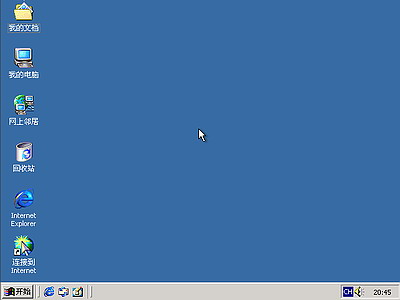
Windows sever 2000启动成功。
四、基本设置
安装完成后,后期工作比安装所用的时间要长很多;
1.安装完成后,接着要检查设备驱动程序是否已经全部安装;
2.设置上网连接,上网更新系统;
3.安装软件;
4.优化和用Ghost备份系统
一、准备工作:
1.准备好Windows 2000 server简体中文版安装光盘,并检查光驱是否支持自启动。
2.可能的情况下,在运行安装程序前用磁盘扫描程序扫描所有硬盘检查硬盘错误并进行修复,否则安装程序运行时如检查到有硬盘错误即会很麻烦。
3.用纸张记录安装文件的产品密匙(安装序列号)。
4.可能的情况下,用驱动程序备份工具(如:驱动精灵)将原Windows 2000下的所有驱动程序备份到硬盘上(如∶Frive)。最好能记蟲靼濉⑼?ā⑾钥ǖ戎饕?布?男秃偶吧??Ъ遥?は认略厍??绦虮赣谩?br /> 5.如果你想在安装过程中格式化C盘或D盘(建议安装过程中格式化C盘),请备份C盘或D盘有用的数据。
二、用光盘启动系统:
(如果你已经知道方法请转到下一步),将2000安装光盘放入光驱,重新启动系统并把光驱设为第一启动盘,保存设置并重启,如无意外即可见到安装界面:
三、安装Windows 2000 server
光盘自启动后,如无意外即可见到安装界面,将出现如下图所示。
screen.width*0.7) {this.resized=true; this.width=screen.width*0.7; this.alt='Click here to open new window\nCTRL+Mouse wheel to zoom in/out';}
}" border="0" />这一步有三个选项“1.要开始安装Windows 2000,请按ENTER;2.要修复Windows 2000中文版的安装,请按R3。要停止安装Windows 2000并退出安装程序,请按F3”在这里我们选第一项按“Enter”键回车,出现下图所示。
screen.width*0.7) {this.resized=true; this.width=screen.width*0.7; this.alt='Click here to open new window\nCTRL+Mouse wheel to zoom in/out';}
}" border="0" />许可协议,这里没有选择的余地,按“F8”。
screen.width*0.7) {this.resized=true; this.width=screen.width*0.7; this.alt='Click here to open new window\nCTRL+Mouse wheel to zoom in/out';}
}" border="0" />这里用“向下或向上”箭头键选择安装系统所用的分区,选择好分区后按“Enter”键回车,安装程序将检查所选分区,如果这个分区己经安装了另一个系统会出现下图。
screen.width*0.7) {this.resized=true; this.width=screen.width*0.7; this.alt='Click here to open new window\nCTRL+Mouse wheel to zoom in/out';}
}" border="0" />要使用所选的分区安装,按“C”键。
screen.width*0.7) {this.resized=true; this.width=screen.width*0.7; this.alt='Click here to open new window\nCTRL+Mouse wheel to zoom in/out';}
}" border="0" />这里对所选分区可以进行格式化,从而转换文件系统格式,或保存现有文件系统,有多种选择的余地,但要注意的是NTFS格式可节约磁盘空间提高安全xxx和减小磁盘碎片但同时存在很多问题OS和98/Me下看不到NTFS格式的分区(这儿既然是Server,个人强烈推荐选择NTFS),在这里选“用FAT文件系统格式化磁盘分区”,按“Enter”键。
格式化所选分区C盘的警告,按F键将准备格式化c盘。
screen.width*0.7) {this.resized=true; this.width=screen.width*0.7; this.alt='Click here to open new window\nCTRL+Mouse wheel to zoom in/out';}
}" border="0" />由于所选分区C的空间大于2048M(即2G),FAT文件系统不支持大于2048M的磁盘分区,所以安装程序会用FAT32文件系统格式对C盘进行格式化,按“Enter”键回车。
screen.width*0.7) {this.resized=true; this.width=screen.width*0.7; this.alt='Click here to open new window\nCTRL+Mouse wheel to zoom in/out';}
}" border="0" />只有用光盘启动或安装启动软盘启动Windows 2000安装程序,才能在安装过程中提供格式化分区选项;如果用MS-DOS启动盘启动进入DOS下,运行i386winnt进行安装Windows 2000时,安装Windows 2000时没有格式化分区选项。格式化C分区完成后,安装程序开始从光盘中复制文件。
screen.width*0.7) {this.resized=true; this.width=screen.width*0.7; this.alt='Click here to open new window\nCTRL+Mouse wheel to zoom in/out';}
}" border="0" />复制完文件后,复制完文件后系统将会自动在15秒后重新启动,这时要注意了,请在系统重启时
将硬盘设为
第一启动盘或者临时取出安装光盘启动后再放入,使系统不至于进入死循环又重新启动安装程序。
重新启动后,首次出现2000启动画面。
screen.width*0.7) {this.resized=true; this.width=screen.width*0.7; this.alt='Click here to open new window\nCTRL+Mouse wheel to zoom in/out';}
}" border="0" />screen.width*0.7) {this.resized=true; this.width=screen.width*0.7; this.alt='Click here to open new window\nCTRL+Mouse wheel to zoom in/out';}
}" border="0" />启动后开始检测设备和安装设备,其间会黑屏二次,这是正常的,完成后出现如下图所示。
screen.width*0.7) {this.resized=true; this.width=screen.width*0.7; this.alt='Click here to open new window\nCTRL+Mouse wheel to zoom in/out';}
}" border="0" />区域和语言设置选用默认值就可以了,直接点“下一步”按钮。
screen.width*0.7) {this.resized=true; this.width=screen.width*0.7; this.alt='Click here to open new window\nCTRL+Mouse wheel to zoom in/out';}
}" border="0" />这里任意输入你想好的姓名和单位,点“下一步”按钮。
screen.width*0.7) {this.resized=true; this.width=screen.width*0.7; this.alt='Click here to open new window\nCTRL+Mouse wheel to zoom in/out';}
}" border="0" />如果你没觴xxは燃窍虏?访茉浚ò沧靶蛄泻牛┚痛蠹?吕玻≌饫锸淙氚沧靶蛄泻湃纭肏6TWQ-TQQM8-HXJYG-D69F7-R84VM,点“下一步”按钮。
screen.width*0.7) {this.resized=true; this.width=screen.width*0.7; this.alt='Click here to open new window\nCTRL+Mouse wheel to zoom in/out';}
}" border="0" />在这里你可以根据需要任选一项,
想配置成服务器选第一
项,配置成工作站选第二项(同Windows 2003一样),选择后按“下一步”。
screen.width*0.7) {this.resized=true; this.width=screen.width*0.7; this.alt='Click here to open new window\nCTRL+Mouse wheel to zoom in/out';}
}" border="0" />计算机名称自己任意输入默认
作为服务器名,输入两
次系统管理员密码,请记住这个密码,登陆时用。
screen.width*0.7) {this.resized=true; this.width=screen.width*0.7; this.alt='Click here to open new window\nCTRL+Mouse wheel to zoom in/out';}
}" border="0" />出现组件选项,根据需要选择,亦可以在安装完成后可在添加/删除里更改,点“下一步”继续。
screen.width*0.7) {this.resized=true; this.width=screen.width*0.7; this.alt='Click here to open new window\nCTRL+Mouse wheel to zoom in/out';}
}" border="0" />日期和时间设置不用讲了,点“下一步”,接着开始安装网络。
screen.width*0.7) {this.resized=true; this.width=screen.width*0.7; this.alt='Click here to open new window\nCTRL+Mouse wheel to zoom in/out';}
}" border="0" />网络设置选“典型”即可,点“下一步”。
screen.width*0.7) {this.resized=true; this.width=screen.width*0.7; this.alt='Click here to open new window\nCTRL+Mouse wheel to zoom in/out';}
}" border="0" />点“下一步”,开始安装组件、保存设置、删除用过的临时文件。
screen.width*0.7) {this.resized=true; this.width=screen.width*0.7; this.alt='Click here to open new window\nCTRL+Mouse wheel to zoom in/out';}
}" border="0" />点击“完成”按钮完成全部安装过程,系统重新启动。
screen.width*0.7) {this.resized=true; this.width=screen.width*0.7; this.alt='Click here to open new window\nCTRL+Mouse wheel to zoom in/out';}
}" border="0" />按Ctrl+Alt+Delete组合键启动系统。
screen.width*0.7) {this.resized=true; this.width=screen.width*0.7; this.alt='Click here to open new window\nCTRL+Mouse wheel to zoom in/out';}
}" border="0" />输入你安装时设置的密码。
screen.width*0.7) {this.resized=true; this.width=screen.width*0.7; this.alt='Click here to open new window\nCTRL+Mouse wheel to zoom in/out';}
}" border="0" />如果你不想配置
你的服务器,可以
以后再配置,直接点“下一步”,将出现桌面。
screen.width*0.7) {this.resized=true; this.width=screen.width*0.7; this.alt='Click here to open new window\nCTRL+Mouse wheel to zoom in/out';}
}" border="0" />将“启动时显示该屏幕”前面的勾取消,下次启动就不会出现该窗口了,直接关闭窗口。
screen.width*0.7) {this.resized=true; this.width=screen.width*0.7; this.alt='Click here to open new window\nCTRL+Mouse wheel to zoom in/out';}
}" border="0" />Windows sever 2000启动成功。
四、基本设置
安装完成后,后期工作比安装所用的时间要长很多;
1.安装完成后,接着要检查设备驱动程序是否已经全部安装;
2.设置上网连接,上网更新系统;
3.安装软件;
4.优化和用Ghost备份系统
继续阅读
菜鸟成长手册—Ghost系统安装全程图解Galahad 2007-09-27 21:06:16请教各位高手月潜 2007-09-27 18:52:43电脑自动关机问题小诗 2007-09-27 16:22:53很羡慕大家用PHOTOSHOP 编辑图片,但它太贵,想知道大家都是用买的软件吗?一丝浮尘 2007-09-27 16:14:57outlook folders in Visitabenniao 2007-09-27 15:22:02请教cabel modem速度问题拐子杀人 2007-09-27 14:56:29excel作曲线求助可怜啊!!! 2007-09-27 13:10:17请教关于msn的问题~~~先谢谢了~一枕清霄 2007-09-27 04:07:14请高人指导,谢谢点点儿 2007-09-27 01:36:54Flash Player 播放不出声音愁与烦忧 2007-09-27 01:32:24
同作者
《PC Magazine》评出2006网上最常用的10大密码排名chaoren 2008-02-05 01:47:05“美国梦”近还是远?中国移民述赴美8年酸甜苦辣chaoren 2007-11-30 19:45:45PHP入门指导:如何学习PHP?chaoren 2007-11-30 00:59:03PCWorld评出史上最难看10款IT产品(组图)chaoren 2007-10-16 02:00:20电脑使用13 忌chaoren 2007-10-03 20:01:59菜鸟成长手册—系统安装全接触chaoren 2007-09-27 21:06:16检查电脑是否被安装木马三个小命令chaoren 2007-09-27 21:06:16个性十足的电脑机箱大比拼!chaoren 2007-08-23 01:20:04十二款操作系统安装全程图解chaoren 2007-08-16 22:56:16开机密码可以这样破解?chaoren 2007-08-04 00:55:37